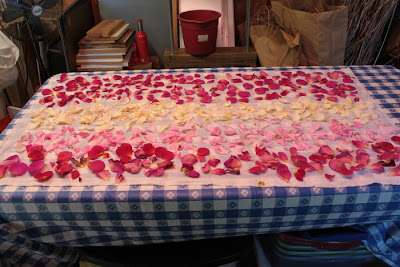
I am so excited that Susan volunteered to write this blog post. She introduces us to a technique that I have never tried. Over to Susan:
As
a horticulturist and avid gardener, I am always looking for ways to use the
plants I grow. I have been experimenting with natural dyeing for three years
and this technique, eco printing, for two. It really is about experimenting, so
don’t feel intimidated by the instructions. Read through them and start as
simply as you feel comfortable. You will soon be hooked!
Eco Printing
on Fabric
Eco
printing, also known as eco bundling, is the discovery of India Flint, an Australian textile artist
who works with natural dyes. In her popular book, Eco Colour, she explains the process
of eco printing. The name I like to give this technique is “nature printing
with steam”. It just seems to more easily explain the
process.
Supplies
·
Fabric
made from 100% natural materials – cotton, linen, silk, wool
·
Sumi,
kozo or other washi paper (Asian papers made from strong fibers) - optional
·
Alum*
·
Washing
Soda*
·
Steam
pot OR large pot with colander placed inside OR sticks, skewers, chopsticks,
etc to wrap bundle to in order to elevate it above the water – it is best to
use a dedicated pot for this technique and work outside with an electric hot
plate.
·
String
and rubber bands
·
Fresh
flowers and leaves. In this tutorial we are working with rose flowers since it
is the flower of the month. Do not work
with toxic or poisonous plants – if you are unsure, do some research first.
Roses are not toxic.
*alum
is a mordant which enables the dye color to adhere to cotton fabric. It is
available wherever natural dye and marbling supplies are sold. Washing soda
assists the alum.
Step 1
Mordant
your fabric by soaking it in an alum solution (4 tsp alum & 1.5 tsp washing
soda per 4 oz (100g) of fabric, dissolved in boiling water and added to 1
gallon of hot water), for 8-24 hours - source: Wild Color by Jenny Dean. The fabric
may be mordanted, dried and stored beforehand. In fact, if you are going to do
eco printing often, it is worth your time to have a batch of mordanted fabrics
on hand.
Alternatively,
try the technique without first mordanting. It is not necessary to mordant silk
or wool.
I
used a large piece of alum mordanted cotton and cotton gauze and a piece of
kozo paper. I also used a small un-mordanted cotton handkerchief with crocheted
trim and two pieces of silk fabric.
Step 2
Wet
your fabric*, wring out excess water and lay on flat surface. Place flowers
and/or leaves on the fabric randomly or in a design or pattern. Optionally lay
another piece of fabric or washi paper over this.
*experiment
with placing material on dry fabric to see what different effects can be
achieved – the steam will moisten it.
Step 3
Roll
up or fold the fabric into a tight bundle.
Step 4
Secure
with cotton string and/or rubber bands.
Step 5
Place
in steamer rack and steam for 1 hour.
Step 6
Allow
to cool before unwrapping. It is best to let it sit overnight so that the colors
continue to dye the fabric, but if you are too excited to wait, unwrap it and
remove plant material.
Step 7
Let
it air dry, then heat set with an iron. You can also put it in the dryer on a
low setting. If you plan to use the fabric as an article of clothing (if you
dyed a t-shirt, for example), hand wash it with a pH neutral detergent.
 |
| un-mordanted cotton handkerchief and silk |
 |
| close up |
 |
| close up |
 |
| alum mordanted cotton sheet – notice the difference in color |
 |
| close up |
 |
| kozo paper close up |
 |
| cotton gauze |
 |
| cotton gauze made into a scarf |
Step 8
Enjoy
your handiwork!
Tips:
- Start with small pieces of fabric and try whatever you find interesting. Keep a record of your results. If there is something you particularly love, try to replicate the technique on a larger piece of fabric, t-shirt, or other article of clothing.
- Shop at tag sales and thrift stores for white clothing (remember 100% natural fibers) and linens, even those with prints on them will give interesting results.
- If you want to learn more, and this is just the very small beginning, buy India Flint’s, as well as Jenny Dean’s books. They are essential resources. Then keep us posted on your experiments!
Notes:
It
is difficult to compare the photos taken outdoors with those taken indoors. The
lighting is different. The cotton handkerchief was very pale in color when I
unwrapped it (how it appears in the photo on the grass), but as it dried, it
darkened to that rich pink!
Thank you so much Susan.
I hope you will try out this technique. What beautiful covers you could make for art journals! Please add a link to your expepriments using the linky below.


